Hello and welcome
MongoDB is a NoSQL(Not only SQL) database that is used to store the data of any format whether it is structured, unstructured, or semi-structured. The traditional database is SQL which is so old and used so far for Data analysis purposes in form of tables but while working with websites or in the web development process to play with databases today NoSQL database is used and in NoSQL MongoDB is so popular so most of the developers prefer it due to ease of access and scalability feature.

NoSql is used when our data is of mixed type or unstructured because SQL only supports the structured data in form of tables whereas NoSQL is a document type database. Now we know what is MongoDB and let's explore MongoDB ore in a practical way. Take a brief overview of the main headings that describe the complete Agenda of the article.
Table of Contents
- Difference between SQL and NoSQL
- MongoDB Installation
- Performing CRUD operations on Command prompt
- Connecting Python with MongoDB
- Performing amazing operations with python and MongoDB
What is the difference between SQL and NoSQL?
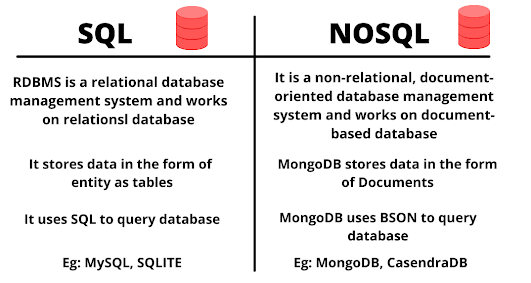
MongoDB was launched in 2009 and before it, a traditional database was used known as the Relational Database Management system(RDBMS) and SQL comes in this category. So before moving with the Installation and practicals of MongoDB its important to know why we use NoSQL databases and how it works differently than SQL and what are its main advantages? The below table will answer all three questions.

MongoDB uses BSON means binary JSON which helps to optimize the speed. MongoDB uses BSON to overcome the following three limitations of JSON.
- In JSON text parsing is very slow and It works in a text-based format.
- JSON's readable format is far from space-efficient which is another concern of the database.
- JSON supports a limited number of data types.
MongoDB Installation
Install the community version of MongoDb from its official website, And install it simply just by pressing the next button and MongoDB will be installed automatically in your c-drive.
Download the MongoDB community version from here
After the successful installation opens the command prompt and enters it into the bin directory of MongoDB. you will find a bin folder in your c-drive program files where MongoDB is installed and inside it, bin directory is present which contains mongo.exe file and simply run this file, And MongoDb server will start.

Now we have successfully set up MongoDB so let's start with creating the database. First, simply run the command as "show DBS" which will list all the inbuilt database which comes with MongoDB.
Create Database
To create a database just type "use mydb". The new database will be created with the name mydb And if the database with this name is already present then the working database will be switched.
Create Collections
As a relational database is a collection of tables, MongoDB is a collection of collections known as documents so create a collection.
mydb.employees
The collection is created but until the collection is empty MongoDB will not list it out when you will run a command to show collections. So, insert at least one document to make the collection visible.
Performing CRUD operations with MongoDB
CRUD basically means create, read, update and delete. we have already created a database and a collection and Now let's insert some documents inside a collection.
Insert one document
MongoDB accepts the data in BSON format which is generally JSON only which is like a python dictionary as key and value pair. To insert a single document use the insert_one function.
Here, we have four fields created inside our document employer Name, post, salary, and availability in an organization. So MongoDB supports multiple data types of data to store whether it is numeric, decimal, string, boolean, Image, datetime, files, etc.
Insert Multiple Documents
It's very simple to store multiple documents, just use the insert_many function.
Here we have inserted three documents at a time to our MongoDB collection.
Read the data
To retrieve the MongoDB provide the simple function find. To print all the documents line by line using the below command.
mydb.employees.find()
There is one more functional named pretty() which retrieves the data and displays it in a pretty good way as its name suggests.
mydb.employees.find().pretty()
How can we query a Database?
Now how can we read the data with a specific field like a name? it's pretty simple to write a query.
mydb.employees.find({Name: 'Rahul'})All the documents named Rahul will be retrieved. While connecting with Python we will see amazing queries to query a database in the forwarding section of this article.
How to get only one field?
Now except document you only want a name in this document then you can follow the below query.
mydb.employees.find({Name: 'Rahul'}, {Name: 1}).pretty()
There is one hack in it that when you run the above query along with the name the id object will also get returned so how to tackle it?
mydb.employees.find({Name: "Rahul"}, {_id:0, Name: 1}).pretty()
How to limit the output of documents?
It is very simple with the limit function.
mydb.employees.find().limit(2)
If you want to print only one document you can use the limit or there is one more function named find_one.
Updating Documents
If you want to update the document use a simple query as below.
mydb.employees.updateOne({Name: Harsh}, {$set: {Post: "Manger"}} )
Deleting Documents
Deleting a document is very simple but before executing think before it because your data will get deleted permanently from the database.
mydb.employees.deleteMany({Post: "Analyst"})
It will delete all the documents where the post is an analyst and if you do not pass any condition in the delete function then the complete collection will get deleted.
MongoDB also has a remove function but in the current updated version, it's been deprecated so it will not work now.
👉 This is how easy is to work with the MongoDB database and thus it is widely used. The thing becomes easier when you work with MongoDB compass. If you have installed a compass with MongoDB then it's fine and if not then again visit the same installation link and download MongoDB Compass. Start the compass and press connect and you will see all your documents and database listed in a very pretty way where you can perform CRUD operations with just clicks.
Connecting MongoDB with Python
Now, we have come on our main heading to connect MongoDB with Python and enjoy querying from our Python shell. You can use Spyder, Pycharm, or Jupyter Notebook to connect MongoDB with Python.
To connect MongoDB server with Python, Python provides various libraries to accomplish these actions like Pymongo, mongo client, mongoengine and if you are working with Python web frameworks like flask you can use this set of libraries to connect with a database as well frameworks also have own libraries to perform a particular task like flask has flask mongoengine library to work with Python Flask and MongoDB.
👉 Here we will use pymongo to connect with MongoDB, you can use any library because all work the same. Install pymongo on your system in a working director using the pip command.
pip install pymongo
Connect with MongoDB
import the installed library and connect the localhost server with MongoDB
Creating a Database and MongoDB Collection using python
we have already seen creating a database and collection but with Python, the syntax is a little bit different.
And when you work Python framework and database there you create a database in your app configuration file whose syntax also differs from normal syntax,
CRUD Operations with Python
Rest all the functions as an update, delete you can perform in the same way.
Querying to MongoDB using Python
This section is going to be just amazing and funny where we will be retrieving the data from MongoDB using Python also we will learn aggregating functions.
let's get started.
Retrieving the documents
Retrieving Documents using the find function
Let's print all the documents one by one using for loop.
Retrieving Documents using Operators
If you know SQL then there are operators like in, exists, less then, or greater than an operator. The same operators are supported by MongoDB with a different look. Note operators in MongoDB are followed by a dollar($) sign to always apply it while querying.
- lt - less than
- gt - greater than
- lte - less than equal too.
- gte - greater than equal too
- in - like membership operator
- or and and
I would encourage you to try a different combination of operators and retrieve the data in various ways.
MongoDB Aggregate and GroupBy
- average(avg)
- Count
- sum
- project
here I will be creating a new collection to demonstrate all the aggregate functions.
let's apply aggregates functions and enjoy querying
This is how aggregate queries with MongoDB work.
SUMMARY
MongoDB is a NoSQL database that stores the data in form of documents in Binary JSON format known as BSON. we have performed various queries from a terminal as well using Python. I hope that you are capable to catch up with Various queries of MongoDB, If you have any queries just fire them out in the comment section below without any kind of hesitation.

Awesome sir ..
ReplyDeleteMost needed content🥰