DialogFlow is a Natural Language Processing Platform introduced by Google used to implement applications related to conversations and experience for customers of the company and the term is so-called Conversational AI or In short, we can call it as Chatbot applications.
Table of Contents
What is DialogFlow?
Dialogflow is a leading chatbot implementation platform that uses NLP technology applications as backend support to create an interactive conversational interface for websites and mobile apps. Dialogflow is dedicated to getting you started with creating AI-based chatbots.
👉 Dialogflow operates on a google cloud platform and is dedicated to google products such as google cloud speech-to-text and Machine Learning expertise. Many companies use Dialogflow to implement message-based chatbots that answer customer basic queries on slack, telegram, Twitter, messenger, etc.
👉 NLP is a powerful technology that enables machines to understand and respond in different human languages. In this article, we will study complete Dialogflow from start to end and help you create your first Dialogflow chatbot application, and guide you on creating more complex chatbots for business.
State different features of Dialogflow
- Develop serverless Apps - Dialogflow offers a special code editor used to build native serverless apps connected to our conversational interface via firebase cloud functions.
- Design Voice-first world - with a single API request we can easily integrate a chatbot that can receive and respond to voice messages.
- Reply on Automatic Spelling Correction - most of the time user does not enter a correct spelling of a word, so there is a feature provided by Dialogflow which is called name automatic spelling correction. It can be used to automatically correct the spelling of words.
- Understand User Sentiments - As Dialogflow is an NLP-based platform, so it performs sentiment analysis which is powered by cloud Natual Language.
What are the Advantages of using Dialogflow?
Dialogflow has various advantages which every individual enjoys while working on it. some of the advantages include.
- User-friendly - The complete Dialogflow interface is user-friendly. You did not need to download any application, only create an account and work directly on your browser.
- Powered by Google Machine Learning - google cloud Machine learning technology is used in Dialogflow which increases its performance and capabilities.
Why Dialogflow?
I know that this question is in everyone's mind even after knowing the features and advantages of Dialogflow. But now I will give you two to three points that will enable you to at least try Dialogflow once and keep it in our learning series.
- Multi-Channel Easy Integration - Dialogflow offers you easy integration of your chatbot with most popular messaging platforms like Twitter, telegram, slack, Viber, Skype, Facebook messenger as well as several voice assistants like Siri, Amazon Alexa, Google assistant.
- Pricing - Dialogflow offers a free edition of chatbot where you can learn and create multiple chatbots.
- Natural Language Processing(NLP) - Dialogflow uses a concept of NLP which provides a better user experience working with it.
Hands-on Experience with DialogFlow
Now you know what is Dialogflow, and why we should learn it. So, it is a better time to make your hand dirty while giving Dialogflow a try and learning its dashboard while creating a simple personalized chatbot.
Create DialogFlow account
The first thing is to familiarize yourself with the Dialogflow dashboard and for that, you need to create your Dialogflow account. So please visit the Dialogflow cloud website and create a simple account using your email address.
Agents in Dialogflow
The Dialogflow agent is a virtual agent whose task is to manage the end-user conversations. In short, understand it as your main application of chatbot. The name of the agent is only known as your chatbot name and all the operations you perform are under a particular agent that you are dealing with.
👉 The Dialogflow agent is the same as the human agent in a call center. Both are trained under certain scenarios and they do not prohibit their training. That's what a chatbot is. In some of the previous articles, we have created a simple chatbot using Python. To learn the basics of chatbots please visit this article.
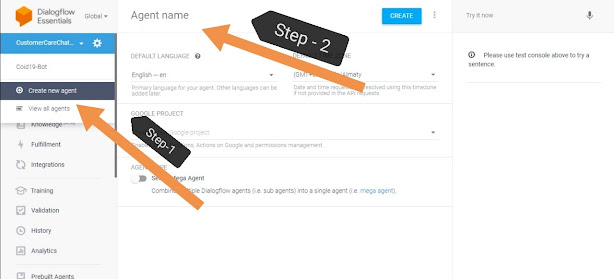
👉 Now once you are signed in to your Dialogflow account then create a new agent. In the left navigation bar at the top, you can see the name of your agent, click the dropdown, and click create a new agent. A new window opens and enter the name you want and click create.
Intents in Chatbot
An intent describes the intention of the end-user for conversation with an agent. when a user writes something in chatbox which is known as end-user expression than your Dialogflow agent checks and matches that expression with the best intent (reply) you have to describe to answer the user query.
👉 So, basically intent is in chatbot reply to each user expression which we need to define when the user fires any query so an agent can respond to it safely.
👉 Below your agent section, you can see the option of intents, click and open intent section. here you can see two default intents, one is welcome intent which is as you start interacting with the chatbot it is to greet the user. Other is default fallback intent which is used by chatbot when it is unable to fetch or understand the user expression then it replies to any random sentence from fallback intent.
👉 Now to create your own intent click create intent and as you open it enters the user's expression saying what the user says and scroll where you can see the response section where you will add the chatbot response in reply to a corresponding user expression.
👉User expression of a single sentence can be in multiple different ways, so you can include them all and have a single response of all that. for example, we are making a chatbot for any company to serve the customer queries then the Intent can be like a user can ask can you answer my question? or would you like to answer my question? or I have one question for you? All these sentences have the same meaning so you can include them all in user expression and response as "yes! How can I help you?"
So let's write the end-user expression and create some Intent for our customer care chatbot. The Intent is comprised of basic 4 things
1) Training Phase - The training phase is an area that includes end-user expression. whatever sentence the chatbot receives matches it with the training phase. As you click on create new Intent below the event section you can see the training phase section and now add some training sentences.
2) Action - For any intent, we can define an Action. when we match an Intent, Dialogflow gives action to the system and action can be used to trigger various actions that are already defined by the system. If you create an Intent like "Please book my flight ticket" you will require information like city, state, timing, etc that you can state in the action section so that chatbot will collect data from users. This is how organizations use chatbots to collect users' data.
so let's create a new Intent including training phase as Please book my flight ticket, and write action as below.
3) Parameters - If we want to march an Intent at run-time then Dialogflow gives a unique entity type to each input from which data can be retrieved at run-time. you can see parameters included in the action and parameter section in the above figure.
4) Responses - Response is a Chatbot response to a particular user expression. below the action section, you can see the response section where you can include text, speech replies to end-user. we have two intent and response for both the intent can be like this as shown in below figure.
This is the response to both separated intents we have created above.
Entities
Every Parameter we define has an entity type. Dialogflow provides many entity types as default which we can use like city, state, phone number, email address, Pincode, etc which helps to match various common data entered by the user is in the correct format and type. It is the same as how we add form validation in websites or HTML forms. For matching custom data we can also make a custom entity. for example, we can define a custom entity as a car for any user who says I want to drive this car. so we can identify the name of the car and reply as ok this car has been booked for you.
👉 In the left menu below the Intent section, you can see the Entities section, visit there and click create Entity. Now you can create an entity named car and define various synonyms for each model of car.
Context
To handle the flow of conversations context is used. The context is the same as natural languages, when a person says "Please book a flight ticket", you have to grasp the context to which they are referring. Basically, context is used to match the intents properly to obtain a meaningful response from a chatbot. Hence, Dialogflow context must be provided to match the Intent properly.
👉 In every Intent section, the first thing you will get is Context so define the context for every intent. If you look above at flight booking Intent Image, we have provided it one context. likewise, you can include many contexts for a particular Intent to get a meaningful response even if the user tries to say a sentence in different ways.
Hence that's the End of Basic Dialogflow. we have created a simple Dialogflow chatbot that can answer our queries.
Conclusion
We have studied all the basic terminologies of Dialogflow which is necessary to know before developing professional chatbots with Dialogflow. we have created a simple messaging chatbot with Dialogflow and had a great hands-on experience working with Dialogflow. There are many things that we can do with Dialogflow like integrating API, importing Intents from CSV files, and creating a fully functional chatbot. We can also implement a response code with backend language, import it and integrate(deploy) our chatbot to any social media platform which I am going to include in upcoming articles, and create an amazing chatbot with deployment on various cloud platforms.
I hope as a beginner it was easy to grasp all the Dialogflow concepts we have studied in this article, if you have any queries please post them in the comment section below 👇.


Hi, thanks for good tutorial.
ReplyDeleteI want to ask, how long we can use dialogflow as free/trial edition. When Google will ask we to pay.
While use of the Dialogflow Trial Edition is free, there are limits on the amount of requests that you can make. For details, see Quotas & Limits. Each request is rounded up to the nearest increment of 15 seconds. Till 12 months you can use without any worry, after some changes you can see in account.
DeleteBusiness chatbot Pretty good post. I just stumbled upon your blog and wanted to say that I have really enjoyed reading your blog posts. Any way I'll be subscribing to your feed and I hope you post again soon. Big thanks for the useful info.
ReplyDeleteThank you so much.
Delete